Scroll down for Q&A section!
When I made a quick video earlier this week demonstrating how you can add some real wow factor to your edible marker by dusting it with luster dust, I didn’t realize how many questions were left unanswered. Does the ink not smudge? Does the dust stick to the rest of the flood icing? Can you use any dust? The list goes on. Well, I spent a little more time in our test kitchen today to see if we could answer some of these burning questions and help you all feel more comfortable with this particular process. We tested like colors of Roxy and Rich luster dusts, Roxy and Rich sparkle dusts, and Sweet Sticks Metallic Lustres on several different colors of dried royal icing, and the results were interesting. Let’s dive in!
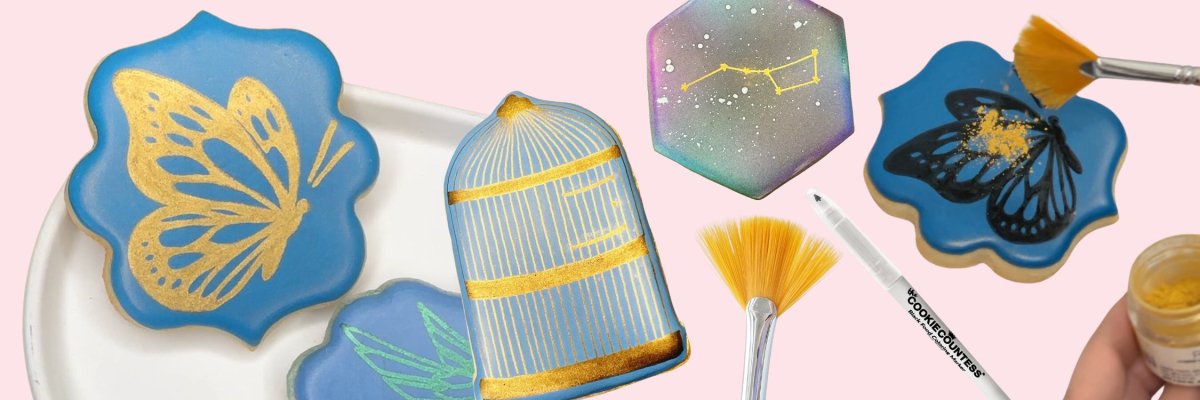
Edible marker is fantastic for so many things: adding details to cookies, coloring in areas that you maybe didn’t want to add extra icing to, making continuous line art designs—the list is long, believe me. That being said, although it’s a great tool, it’s not particularly…fancy. Glitzy. Glamorous. You get the idea. But with the addition of one or two other tools, we can take a plain black edible marker to the next level of coolness.
One of the most commonly asked questions we get is how to make gold royal icing (we’re talking metallic gold, not just a gold-ish color) to pipe details and designs directly onto a cookie. Although that one is a little tougher, we can take another avenue to get to the same basic concept. First, draw your design onto your cookie with a plain old black edible marker. You want to work relatively quickly, so that the marker lines themselves are still a little bit tacky pretty consistently across the design (think: if you pressed your fingertip onto the marker lines, you would come away with transfer on your finger); if you take a little longer to sketch out your design, just do a quick re-trace of the areas you did first to reactivate the ink.
Once you have a consistent ink line across the cookie, use a fan brush to tap a little bit of gold luster dust across the cookie, and gently use the bristles of the fan brush to work the dust across the marker lines. Once the lines are fully covered, sweep the fan brush back and forth across the cookie to remove excess dust. Those plain black marker lines will have turned to gold right before your eyes, taking your design to the next level.
I know your next question—and yes, you can use any color of luster dust to the same effect. Just make sure to choose colors that will show up well, obviously; if you flood in black and then use dark purple luster dust, the design might be more subtle and might not show up as well as a brighter, more metallic luster dust.
It’s that easy to add fine gold lines and details to your cookies with minimal effort. Add background florals, shimmery constellations, or any number of cool effects to your cookies for that extra wow factor that will have everyone saying that your cookies are (almost!) too pretty to eat!
The Marker
- Can you use any brand of marker?
- Yes, this should work with any edible marker. What matters most is that you have good ink flow and not a dried-out husk of a marker. The dust needs something to stick to, so pop open a new marker and get creative.
- Doesn’t the marker ink smudge when you brush the dust over it?
- Nope, not in our experience. The ink is still wet enough that if you dragged your fingertip across the marker lines, it would definitely smear, but the application of tapping the dust over the ink and the gentle sweeping of the dust across the cookie means that the ink dries up quickly and doesn’t have time to smudge. If you have a particularly wet marker, you can certainly tap the dust over the full design before sweeping the excess away (instead of brushing the dust over the lines).
- Isn’t the marker dried-up by the time you apply the dust?
- Well, not in my experience, but if you are making a particularly involved design that takes you a long time to draw onto your cookie, you can always just do a quick re-trace of the design to reactivate the ink before applying the dust. It really just needs to be a little tacky to get the dust to stick to it.
The Dust(s)
By far the most common question, people wanted to know if the kind of dust you use matters. We did some side-by-side comparisons, and the answer is: yes and no. Let’s take a look.
- What is the difference between luster dust and sparkle dust?
- Luster dust tends to have a little more pigment in it and not quite so much glitter. Sparkle dust is heavy on the glitter, but not quite as much actual color. Cutting to the chase—both worked, to varying degrees.
- Does the brand of dust matter?
- I did find differences between the two brands I used, but those differences varied more from color to color. The concept did work with all of the dusts, but the Roxy and Rich luster dust seemed to be the consistent winner, in my opinion.
- Does the type of dust matter:
- Yes, although again, all the dusts did work to varying degrees. I found the luster dusts resulted in a richer color transferred to the ink lines, but the sparkle dusts definitely left sparkle behind for a more glitzy look. This would be up to personal preference, but they did all work.
- Does the color of dust matter?
- On this one, I can say unequivocally YES. On the golds, for example, there wasn’t much of a difference between the Roxy and Rich and the Sweet Sticks, but on the blues, the Roxy and Rich light blue sparkle dust and the Tiffany Blue Sweet Sticks Lustre resulted in a more silvery finish than the resulting darker blue of the Roxy and Rich luster. We didn’t have a rose gold Roxy and Rich luster dust to match the rose gold colors in the other two products, so we used a copper color that was just a little bit darker (and for the record, the rose gold sparkle dust and the Sweet Sticks Lustre were very similar to each other in their respective jars); that being said, the Sweet Sticks Lustre Dust was much less “rose” and more pearlescent in its results—although it was still very pretty! This would be a matter of trial and error, but if you don’t have luck with this technique the first time you do it, test out another dust color and see if maybe that was the problem.
- Will this work with TMP gold?
- The simple answer: I don’t know. We don’t have this product in our kitchen, so I was not able to test it out one way or the other. My guess is that it would work, but again—I don’t know for sure. If you test it out on your own, though, feel free to share your results with us! We love a healthy data pool lol.
The Technique
- Does the dust stick to the rest of the flood icing when you brush it away?
- I didn’t find any of the tested dusts to have particularly “stuck” to the icing once brushed off. That being said, the luster from the luster dusts did leave a tiny bit of a pearlescent sheen evenly across the full cookie, but no color anywhere other than the marker lines (and the sheen being left behind was more noticeable on the white-flooded cookies, as opposed to the colored floods—definitely something to keep in mind as you choose what color flood you’ll try this technique on). I thought the larger sparkle particles would possibly stick, but everything brushed away cleanly. One final note here: if you don’t flood all the way to the edges of your cookies, expect to see a little bit of dust along the edges.
- Are you sure it won’t transfer color to the rest of my flood? Like, really really sure?
- At the end of the day, I can only speak to the products I personally tested, and I can’t guarantee that every cookier’s icing recipe/flood/etc will produce the exact same results. The most important thing I found was to make sure my icing was 100% dry, with no tackiness whatsoever. If your icing feels even the slightest bit sticky, then chances are the dusts will stick; it’s that simple. You may also find a dehydrator helpful for giving that smooth, dry finish to your flood icing; you obviously don’t want to leave your cookies in there for hours to dry out, but 10-15 minutes in a dehydrator can be very helpful for getting your flood icing on the right track to drying smooth and shiny.
- What brush works best for this technique?
- I found that a fan brush was the perfect tool for this technique. The bristles aren’t tightly packed and dense, so they don’t put a lot of pressure on the marker lines or the icing. Instead, the bristles just gently attach the color and then sweep away the excess. Some cookiers prefer to use a fluffy brush, so if the fan brush isn’t your thing (or if you just don’t have one in your cookie arsenal of tools), you can give that a try. Just use light sweeps across your cookie—no hard pressing or buffing needed.
- What kind of brush motion is needed for this to work?
- Tap a little bit of dust onto the design with the fan brush. Holding the bristles of the fan brush parallel to the cookie, gently sweep the edge of the brush across the design, pushing any excess dust as you go. Once the color has been fully distributed, hold the brush vertically and use the bristles to briskly brush back and forth to sweep off any excess.
- Does the dust need to sit for a while before being brushed off?
- No, not at all. Once the dust has attached to the wet marker lines, everything dries up, and you are ready to sweep off the excess.
- Seems a shame to waste all that extra dust!
- I will confess that for the purposes of tutorial videos, we tend to waste more product than we ordinarily do, but you don’t have to! If you do this process on a piece of parchment paper, you can simply fold the paper in half and deposit the extra dust back into its jar. (Or simply scoop it up with your brush bristles and use it for the next cookie.)
- How did this technique work on the different flood colors?
- Really well, actually! The lighter colors (white and light blue) both gave beautiful results. But the black and navy were probably my favorites! The dust colors just really popped (especially the Roxy and Rich lusters), giving almost a neon effect with the emerald green luster over the black icing. Again, this would call for a little more experimentation, but you could definitely come up with some gorgeous combinations!
Miscellaneous Questions
- Does the design smear once bagged?
- In our test kitchen, we didn’t have that issue. Just make sure you’re using the right kind of bags—cello bags tend to stick to flooded cookies in general, so poly bags are a better bet. You can also do a quick dust of cornstarch over your cookies before bagging to try to prevent sticking.
- What projector do you use?
- I use the Akaso Mini Projector in the corded version, although they do have a Bluetooth version.
- My marker pokes through my icing when I try to write on it. What gives?
- This could be a matter of icing that’s not 100% dry, or it could be a matter of just practicing to not put so much pressure on the icing when you’re writing. Extra fine-tip markers can be extra-pokey, so maybe try a slightly broader tip or a brush-tip marker.
Am I willing to wager my firstborn child that you will have complete success with this technique? I meannnnn, my feral second-born, maybe? (Just kidding! I love both of those maniacs equally lol.) Getting back to the question—no, no, I’m not.
BUT.
I do feel confident that with a little practice, this could be a technique that you can easily add to your repertoire. As with anything, if it doesn’t 100% work for you the first time, the best thing you can do is some troubleshooting to see what you can change that might change your results in a positive way. As always, we’re here to help, so feel free to reach out if you have any questions!


Comments
Leave a comment