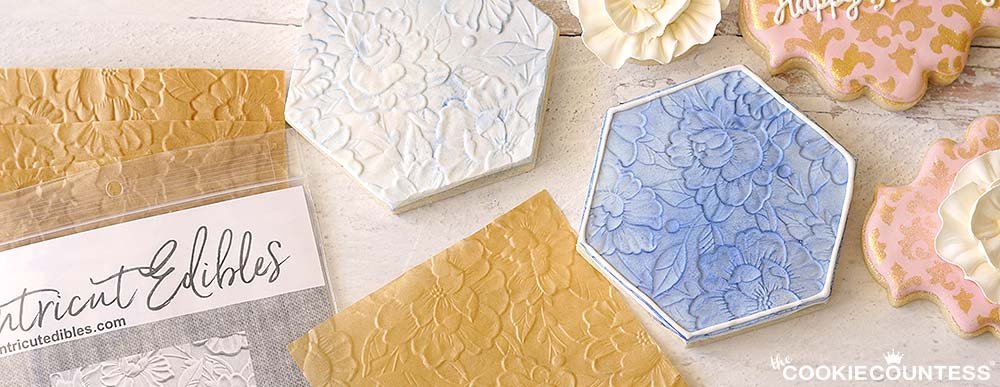
How to Use 3D Parchment Paper: Tricks for Royal Icing
Parchment texture sheets are a fun way to add dimension and designs to your cookies. They come in dozens of styles for every occasion (shop link). Some of the most popular designs we sell are wood textures, leaves, birthday words, and mermaid scales.
These small parchment sheets can be used with royal icing, chocolate, Isomalt, hard candy, marshmallows, meringue, ganache, buttercream, or fudge.
Reusable up to 10 times!
- Royal icing must be completely dry before removing.
- Chocolate needs to be completely set before removing.
- Buttercream must be frozen solid before removing.
Tips Before You Start
For cookies:
The amount of royal icing matters. Medium to thick 15-20 consistency royal icing seems to work best. This also shortens the dry time since there's less liquid to begin with.
Emboss or deboss. The designs can be pressed into the surface (debossed) or raised (embossed). Be sure to choose the side of the paper that will give you the look you're going for.
Reusing. They can be reused if the royal icing is completely dry before removing. The only exception to this that we've found so far is using the texture sheets on extremely dark or deeply saturated colors. The color may bleed into the parchment. They can still be reused on the same deep color, but the color may transfer if you were to try and reuse the sheet on a light or white colored icing. Reuse for buttercream may be somewhat limited due to the grease in the frosting.
Other medium besides royal icing. Great for buttercream on cookies, cakes, and cupcakes as well. Just freeze upside down on the parchment texture sheet until the buttercream is solid before removing.

Parchment shown is Bubble Cobblestone and has been colored with edible airbrush.
Using Your Parchment
Start at one edge of the texture sheet and slowly work toward the opposite side. Push out any trapped air as you go. This is the same method as when you're applying adhesive shelf liner or Contact paper to a surface. You can see the trapped bubbles through the parchment texture sheet as you're working. Use a scribe or toothpick to remove the bubble and continue moving across the surface until you reach the other side.
Allow the royal icing to dry COMPLETELY, usually overnight. Dry time depends on the conditions where you live. A dehydrator or fan can speed up the process.
To remove, start at a corner and peek to see that no icing is sticking to the paper. If it is, gently press the paper back down and check later.
If you remove the sheets before completely dry, the cookies will still have texture but instead of a smooth surface, it will look more like concrete or stucco. Not all bad. Unfortunately, the sheet may not be reusable unless you want a rough finish on subsequent cookies.
If you discover a dreaded air pocket when you peel off the paper, there's still hope. Squeeze a little extra icing into the hole and smooth with your gloved finger. Good as new!
Grating the Edges
In the video below, you'll see Sarah using a fine grater to straighten out of the edges of the icing. This is, of course, optional depending on your needs and level of Certified Cookie Perfectionist (CCP).
Adding Color
If you've used white icing, and want to add color after the icing has dried, they are a few excellent options.
Use airbrush. Certainly the fastest method, using airbrush will give your design extra interest and dimension.
Use edible dust colors. Petal dusts (found here) are super fine edible pigments that can be applied with a fluffy brush. You can use multiple colors to highlight different parts of the design.
Using edible paints. Water Activated Metallic Food Paint (found here) is a great choice if you want to get very detailed with your coloring. They come in many colorways and can be mixed with water or vodka.

This cookie has been painted with Metallic Edible Paint we have a few holly leaf designs available.
Recommended for You:
Piping Bag Tip Tube Covers - Set of 4
AtecoDon't let your icing bags leak or dry out! Use these covers on bags with Ateco couplers and standard tips on them. Reuse them again and again. Se...
View full detailsBlack Fine Tip Food Marker
The Cookie CountessA black edible-ink pen is essential for your decorating kit. Use these high quality markers for: Marking up baked cookies for planning designs Wr...
View full detailsStainless Steel Measuring Cups 4 Piece Set
The Cookie CountessIncredibly high quality, with no plastic parts. Whether baking or cooking you'll reach for these essentials again and again! THESE ARE THE LAST SET...
View full detailsCookie Order Form 5 x 7, 50 sheets
The Cookie CountessThese cute sheets will help you plan your cookie orders. The back has an area for sketching and pricing planning. Size: 5" x 7" 50 Sheet Pad Doub...
View full details-

Introducing the Cookie Countess Cookie Capsule Collection!
Read nowTired of using boring clear bags as packaging for your beautiful decorated cookies? Or maybe you’ve been looking for a more protective way to package them that is just as pretty as the cookies themselves? Well, look no further than...
-

Stamped Jack-o-Lantern Cookies: an Easy Halloween Treat
Read nowSo you want to make Halloween cookies, but you don't really feel like making or using royal icing? Well, do we have the design for you! Look no further than the Cookie Countess Jack-O-Lantern cutter and stamps set to help...
-

Make and Decorate Easy Mini Jack-o-Lantern Cookies
Read nowHalloween is one of the biggest cookie holidays of the year, and I personally think that can be chalked up to the sheer number of fun/spooky/adorable/creepy designs this holiday lends itself to! Let's look at one of the most basic--Jack-o-Lanterns!...


Comments
Leave a comment